xglue
xglue.RmdMotivation for xglue
I wrote xglue because for a recent working paper, we needed to generate several customized Latex tables, like the following:
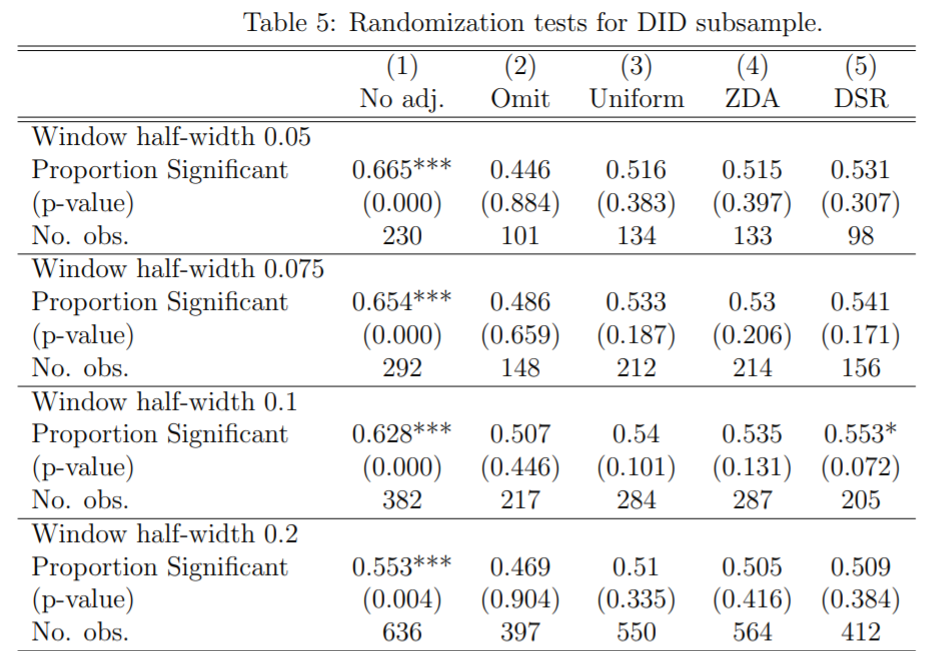 The table is a bit longer and contains data from many statistical tests. While all the data can be easily merged into a data frame in R, it was not straightforward how to best generate this fairly customized Latex table in a reproducible workflow. Building the table by pasting R strings together was inconvenient. E.g. Latex has many backslashes \, which must be converted to double backslashes \\ inside R strings making things even harder to read.
xglue solves this problem by having templates as files that include placeholders and blocks that allow to collapse vectorized expressions or perform group_by operation on data frames to combine strings. The template for the table above can be found here. Simpler examples that explain the usage are below.
Installation
The package is hosted on r-universe. To install it, just run:
options(repos = c(
    skranz = 'https://skranz.r-universe.dev',
    CRAN = 'https://cloud.r-project.org'))
install.packages('xglue')
Starting example: A template with collapse block
Here is a simple example of an xglue template:
Hello
#< collapse ","
{names}
#>
!

Greetings, {myname}
The following code loads the template and then fills the fields {name} and {myname} with the values of the corresponding R variables.
library(xglue)
tpl = readLines(system.file("examples/hello_tpl.txt",package="xglue"))
names = c("Anton","Berta","Charly")
myname = "Sebastian"
xglue(tpl)
## Hello Anton, Berta, Charly!
##
## Greetings, Sebastian
The main difference to the glue package is that our template can contain blocks, like the collapse block.
#< collapse ","
{names}
#>
It means that the elements of the vector names will be collapsed to a single string as if calling in R paste(names, collapse=",").
Special blocks always open in a new line starting with #< and close with a #> line. Note that in the created content there will no new line before and after the block i.e. we get the output
Hello Anton, Berta, Charly!instead of
Hello
Anton, Berta, Charly
!
If you want a line break before or after a block just add an empty line before or after it.
Example with use data block
Consider the following subset of the starwars data set in the dplyr package.
library(dplyr)
data(starwars)
dat = starwars %>%
  filter(species %in% c("Droid","Wookiee")) %>%
  select(species, name, homeworld)
dat
## # A tibble: 8 x 3
##   species name      homeworld
##   <chr>   <chr>     <chr>
## 1 Droid   C-3PO     Tatooine
## 2 Droid   R2-D2     Naboo
## 3 Droid   R5-D4     Tatooine
## 4 Wookiee Chewbacca Kashyyyk
## 5 Droid   IG-88     NA
## 6 Droid   R4-P17    NA
## 7 Wookiee Tarfful   Kashyyyk
## 8 Droid   BB8       NA
Assume we want to generate a Markdown file that has a subsection for each species which contains a table of the characters of that species. The result should look as follows:
## Star Wars Characters By Species

Number of total characters: 8

### Characters of species Droid (6)

|Name                |Homeworld           |
|--------------------|--------------------|
|C-3PO               |Tatooine            |
|R2-D2               |Naboo               |
|R5-D4               |Tatooine            |
|IG-88               |NA                  |
|R4-P17              |NA                  |
|BB8                 |NA                  |

### Characters of species Wookiee (2)

|Name                |Homeworld           |
|--------------------|--------------------|
|Chewbacca           |Kashyyyk            |
|Tarfful             |Kashyyyk            |
Here is the xglue template we use:
## Star Wars Characters By Species

Number of total characters: {nrow(dat)}

#< use dat; group_by species; collapse "<<newline>>"

### Characters of species {first(species)} ({nrow(.DATA)})

#< ignore
The created markdown tables will look e.g. as follows

|Name                |Homeworld           |
|--------------------|--------------------|
|Chewbacca           |Kashyyyk            |
|Tarfful             |Kashyyyk            |

#>
|{fill('Name',20,'')}|{fill('Homeworld',20,'')}|
|{fill('',20,'-')}|{fill('',20,'-')}|

#< collapse <<newline>>
|{fill(name,20,' ')}|{fill(homeworld),20,' ')}|
#>
#>
We now have a use data block starting with the line
#< use dat; group_by species; collapse "<<newline>>"It means that we take the data frame dat from the R environment. We then split it into one sub data frame per species and apply the template inside the block for each sub data frame and collapse the results to a single string adding a line break between each chunk. (The <<newline>> is a special symbol for the collapse argument. You can change it with the newline argument in the call to xglue.)
The template inside the block should return a single string for each sub data frame. It is similar to a dplyr summarize command that should return single value for each group.
For this reason, we e.g. use the function first in our field {first(species)} for the subsection header. Inside the block, you can access the special variable .DATA that contains the current sub data frame, see e.g. the {nrow(.DATA)} field.
There are other blocks nested inside the use block. An #< ignore block can be used to comment your template. Everything inside that block will be ignored.
More importantly, the collapse block
#< collapse <<newline>>
|{fill(name,20,' ')}|{fill(homeworld),20,' ')}|
#>
generates the rows of each table.
The function fill is a custom function that we specify before our call to xglue. Here is the code that then generates the markdown file from this template:
Adapting factors using the forcats packages
A powerful complement to the xglue package is the forcats that simplifies ordering and other manipluations of factor variables. Here is an example:
library(forcats)
dat = starwars %>%
  mutate(
    homeworld = fct_explicit_na(homeworld,"unknown"),
    species = species %>%
      as.factor() %>%
      # Sort by frequency
      fct_infreq(TRUE) %>%
      # Lump together if there are less than 2 species
      fct_lump_min(2,other_level = "Other") %>%
      # Change NA value also to Other
      fct_explicit_na("Other")
  )%>%
  arrange(species, name)
xglue(tpl)
The result is shown here.
Using a function for more generic specification of table columns
In our example above, we fixed the two columns Name and Homeworld in the template. What about a more generic template where we can specify arbitrary table columns in our R code?
For the markdown table, the simplest way is to use an R function that generates such a table. Consider this template:
## Star Wars Characters

Number of total characters: {nrow(dat)}

#< use dat; group_by species; collapse <<newline>>

### Characters of species {first(species)} ({nrow(.DATA)})

{md_table(.DATA, cols)}
#>
We can use it with the following code:
md_table = function(data, cols) {
  str = knitr::kable(data[,cols], "pipe")
  str = paste0(str, collapse="\n")
}
cols = c("name","homeworld","hair_color")
tpl = readLines(system.file("examples/starwars2_tpl.md",package="xglue"))
xglue(tpl)
Using pre blocks
An alternative using R functions for such more dynamic templates are pre blocks. Consider the following example that also generates our Star Wars Markdown tables with customly specified columns:
## Star Wars Characters By Species

#< use dat; group_by species; collapse <<newline>>

### Characters of species {first(species)} ({nrow(.DATA)})

#< pre
|
#< collapse
{fill('<<cols>>',<<ns>>,' ')}|
#>

|
#< collapse
{fill('',<<ns>>,'-')}|
#>
#>

#< collapse <<newline>>

#< pre
|
#< collapse
{fill(format.na(<<cols>>),<<ns>>,' ')}|
#>
#>
#>
#>
The code in the pre blocks will be first compiled. These blocks can generate the code for the actual templates. When the pre blocks are compiled, all fields inside a << and >> block (can be customized with the arguments pre.open and pre.close to xglue) will be replaced. Other blocks, like collapse blocks will also be run inside a pre block.
We can just generate the resulting template by setting the argument just.pre=TRUE:
pre.tpl = readLines(system.file("examples/starwars_pre_tpl.md",package="xglue"))
tpl = xglue(pre.tpl)
The resulting template looks as follows
## Star Wars Characters By Species

#< use dat; group_by species; collapse <<newline>>

### Characters of species {first(species)} ({nrow(.DATA)})

|{fill('name',20,' ')}|{fill('homeworld',12,' ')}|{fill('hair_color',10,' ')}|
|{fill('',20,'-')}|{fill('',12,'-')}|{fill('',10,'-')}|

#< collapse <<newline>>
|{fill(format.na(name),20,' ')}|{fill(format.na(homeworld),12,' ')}|{fill(format.na(hair_color),10,' ')}|
#>
#>
If you keep the default just.pre=FALSE then xglue just returns the results of compiling this template again.
Addmittedly, templates with pre block may be not very easy to read, but still they can be helpful in certain instances.